

Masking Fluid
One of the greatest partnerships with watercolour paint is masking fluid. However some like it and others dont. I feel it has its place for the right occasion.

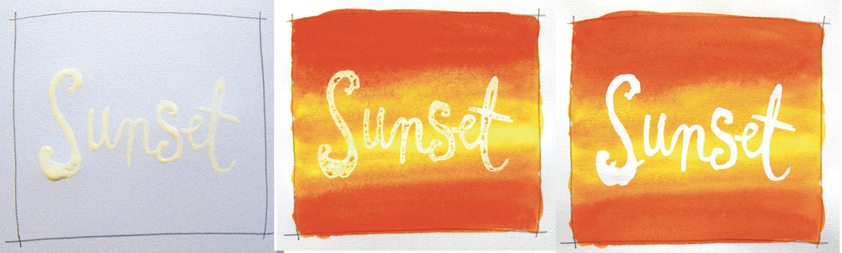
For those not familiar with it, this material is a pre-preparation tool to keep those areas of your picture clean while you’re busily painting in sections around it, like wanting to keep your fluffy clouds white in a blue sky –you would paint in masking fluid over the cloud shapes then once it dries it acts as a water repellent allowing you to paint the blue sky in freely over your clouds. Once the paint dries you gently rub off the masking fluid and it reveals the protected section unscathed. The advantage of doing this is so you get a nice, clean, “uncontaminated” area of colour. If you didn’t use masking fluid in this scenario you would have to paint around the clouds leaving lots of obvious, clumsy, brushmarks and as a result it could be a bit distracting to the rest of your painting.
It does have its drawbacks though. Even though its not sticky when it dries, the masking fluid can dry while you’re still using it. To combat this instead of a normal water jar to wash out my brushes I use warm, soapy water. This helps alleviate the congealing on the brush as well as keeping the brush hairs intact. Its also good practice to NOT use your best or most expensive brushes as they wont return back to their normal condition. I keep aside three of my crappier brushes purely for masking fluid use. The other negative is that unless you use it regularly the masking fluid can dry up and become redundant, so if you’ve forked out for a quality bottle you’re looking at about $30 down the drain for intermittent use.
As with my all my explorations I’ll start out using traditional methods then see what else I could unconventionally. First things first – a little test run.

One thing you’re always warned about is that you shouldn’t leave masking fluid on paper for too long because it can pull off the paper in the process or if its a coloured masking fluid it can stain the paper. I’ve always doubted that claim, especially the former reason. I say this after finding an unfinished gouache painting I did that was at least two, maybe three years old that still had some masking fluid on it and it came off fine.
Although I never plan on leaving it on that long again, it seemed worthwhile doing a timescale test as well. But I will say the quality of the paper you’re using would count for something. This test wasn’t about comparing masking flluid brands, a way too expensive exercise, but instead focussed on the following:
• how long you can leave it on paper;
• if the saturation of the paint effects its removal (ie the colour doesn’t end up smudging or feathering);
• if you can layer more masking fluid on top of watercolours without removing the underlayer; and
• compatibility with different types of papers.
DURATION TEST
For those interested I used Winsor & Newton masking fluid and the paper was a Stillman & Birn Extra Heavy Ivory sketchbook for this and the next two tests.

My intention was to remove the mask at different intervals over a week but completely forgot about it so the final one was removed after a few weeks. As you can see there is no paper tearing or discolouration.
PAINT CONCENTRATION
This test was too see if you painted heavily over it and whether it influenced the masking fluid efficacy. It left behind a brittle edge on some meaning the masking fluid lifted off the pigment that was sitting on top of it.

LAYERED MASKING FLUID
The below test was leaving the masking fluid on and layering new colours at seperate times.

This next one was removing masking fluid then adding some more over exisiting layers. I was trying to see if I could put more masking fluid on top of watercolours. In the end it was a bit of a “meh” result. It did pull off some of the paint underneath while I was applying it and again when I was removing it.


DIFFERENT PAPERS
I think if anyone was to use masking fluid they should use a decent watercolour paper, but I thought it would be interesting to see how it would take to other kinds of paper, especially for those of us that like to play around with different materials or do a bit of mixed media.


RESULT
These examples were all done in one day and I found all worked well. Keep in mind however that these were small area tests the results for a large area of masking fluid might vary. On the smoother papers it was harder to remove, eg. copy paper and cartridge paper, possibly some of the fluid may have seeped into the paper to cause this rather than sitting on the surface.
My opinion is, if you’re wanting to use masking fluid quite liberally its best to use a proper watercolour paper only because it will buckle under all that liquid. However, if you’re doing some mixed media on cartridge paper and want to use it for highlights, etc I think its perfectly fine.
Masking fluid is not as temperamental as most suggest. Though it’s always a good idea to do a test run on your chosen paper because brands and products can vary. Areas of built up colour may not leave a clean result so be prepared for that too.

Watercolours are a great medium to create drama or atmosphere because of all the wonderful blends you can do. It’s also a great way to creating scenes that have extreme depths of field – the optical illusion of there being a great spatial distance between the foreground and background. Like when you take a photo with a marco zoom and the subject is really sharp and clear but the background is completely blurred out. Masking fluid allows you to create those pictures easily.
To begin with I found some photos on shutterstock to use as reference. You can see that they all have strong depth of field. Although one is clearly photoshopped for the purpose of this exercise that was fine because this type of painting lends itself to artistic licence.


So in these types of paintings masking fluid is used to protect either the main subject matter or what’s in the foreground.
The background is the easiest part to execute, though its a good idea to work out what colours you want to use beforehand. When you want a blurry background best practice is to lightly brush the paper first with a bit of water. This wet on wet technique eliminates any residual brush strokes when it dries. Even though they were small pictures it took me a couple of sittings to complete because I wanted each layer to dry before adding the next one plus… I’d get distracted waiting for the paint to dry and end up doing something else! As a handy hint, set up a couple of paintings so you can rotate them while you’re waiting for one to dry, or pick a nice sunny day where you can leave them in the sun to dry quickly.


With the swan and snowflakes paintings its pretty obvious the advantages of using masking fluid. Can you imagine painting around every single snowflake?! Some of you might suggest painting them in afterwards with white paint but I think it would have a very different result. Using the white of the paper makes the whole scene and snowflakes feel lighter, like there’s a certain delicateness about it.

Although masking the swan meant I was left with a nice clean white for its body, the point of using masking fluid in this picture was so that the background blends were seamless in their changing tones. If I hadn’t of used it I would’ve had to physically paint around the swan creating a messier and clunkier background finish.

The daisy one was more about wanting to accentuate the contrast between the blurry surrounds and the in focus flowers, like a zoom lens. The masking fluid gave me well defined edges and shapes which helped play against the really blurry ones in the background.
For all of them using the masking fluid made it so much easier to work on the backgrounds without the stress of worrying about accidentally painting in the foreground sections.

I’ve written before how I’m not very comfortable with creating textures or playing around with different colour combinations but one good thing that comes from the following type of exercise is that I can just go for it, no expectations, no experience, just free fall.
If I was to really embrace the exploratory nature of this it meant my tools should also be unconventional as well, ie no paint brushes. Thankfully I have hoarder leanings and have banked up random pieces of packaging and utensils for such occasions, so it was nice to justify having kept them for so long.

Amongst them I had pieces of bubble wrap, egg cartons, styrofoam packaging, string, timber offcuts, an old dish sponge, toothbrushes and takeaway cutlery. It was also really important to me that none of these items were store bought but were all upcycled/recycled rubbish. Even the colours I chose were tubes of paint that never get much action so it was a good chance to use them up as well.
It took a few sittings to finish them having to allow not just for the masking fluid to dry but the paint as well, however it was a lot of fun and the results were really cool. I wish that I could say it was all planned out ahead but with this type of art making you have no way of knowing what you’re going to produce until the very end.
The only thing I was conscious of was whether I wanted to keep the masking fluid on after each layer or remove it. So for each one I tried something different. Even the colours worked quite well together despite the very non-arty process of choosing them.
Green one
This one I stamped the masking fluid on with a little piece of styrofoam cut from a takeaway container which I added some markings to. Once the first layer of colour dried, I removed the masking fluid and added more with a takeaway fork, followed by a different colour. All the paint was applied with an old kitchen sponge then spritzed with water to let the colours spread out.


Yellow one
I applied the masking fluid with a piece of timber and some string which I swirled around on the paper. Once the first layer of colour dried I removed some but not all of the masking fluid then applied more with bubblewrap. The yellow paint was painted on with a broad brush (I buckled) and a bit of splatter, then used an old toothbrush for the red paint.


Black one
I didn’t remove any of the masking fluid until the very end here, and it was applied by splattering with a toothbrush and stamping with a piece of anti-slip rubber matting. Most of the paint was added with a kitchen sponge by stamping and squeezing the excess paint out letting it splatter.


RESULTS
As mentioned I’m not a texture or abstract artist so when I approach these exercises there’s a lot of doubt beforehand. I have very little instinct for this kind of art and I do rely a lot on my intuition to “feel” my way through a drawing or painting, so I was really surprised and impressed with the results.

This exercise was inspired from the sponge cakes my mum and aunties used to make where they would take a paper doily, place it on top of the cake then dust icing sugar over it. The doily would be removed to reveal a pretty floral pattern in sugar form. My idea was to create a delicate, intricate floral pattern with masking fluid then let the colours blend and move across it like the icing sugar.

FIRST ATTEMPT
Although they look nice and colourful it was not the finish I had in mind. My brush, despite its fineness, wasn’t fine enough. I wanted really delicate and intricate linework but the combination of the brush and the density of the masking fluid wasn’t going to achieve that.


THINKING TIME
This exercise was put on the backburner with a big question mark hanging over it. I wanted to try again but unless I explored using other materials my results would be the same. So how was I going to get a thinner line? Do what everyone else does when they need answers, I googled it.
Unfortunately when I researched other options like masking fluid pens, ruling pens etc. the reviews ranged from awesome to awful. Plus living in Australia where the population is smaller than the States or UK a lot of these products are either imported, only available in specific stores or purchased by overseas order, whichever way it meant this was going to be an expensive test drive.

The only product that was closest to being able to give me that finest of line was Fineline Masking fluid – a little pre-filled bottle with a superfine metal nozzle acting as its nib. So I waited with anticipation for the international delivery of what could be the answer to my masking fluid prayers.
The only problem was when my package arrived it was sitting on my front porch for a day or two in the middle of winter (I didn’t know it was there) so when I opened it up the masking fluid was completely solid!

At a lost as to what to do, it only dawned on me weeks later that I didnt buy it for the actual masking fluid but for the applicator. I couldn’t get the dried fluid out of the bottle so I refitted the nozzle onto a little travel spritzer bottle I use for water, it wasn’t a perfect fit but stable enough to try out. I filled the bottle with my Winsor & Newton masking fluid and then… the clouds parted, the sun beamed and the angels sang.


It did take some getting use to, for example, the masking fluid was quite runny and as the applicator doesn’t have a filter inside that controlled the flow, it would collect at the end as a little blob each time I stopped. Once I started to anticipate this I began to either dab it on a paper towel or try and use that blob to work for me.


The only other thing that I had to allow for was that as it was masking fluid the applicator would dry and clog up so I had to clean it out with warm soapy water and poke the nozzle to clear it. However, these pictures were A3 in size and I only had to clean it out once for each picture.


This second attempt was much more closer to what I had in mind, in fact it was better than what I could have expected.


FINAL RESULTS
I cannot express how much this was a game changer for me, not just for this exercise but for future ones. Playing around with mediums beyond their traditional use literally ignited my imagination with more uses and ideas that I couldn’t conceive of.
Previous post
The Creative Plan – Day 9 Watercolour Paints
Hello Meegan, this is your high school friend George. I’ve been trying to get in contact with you for ages- you’re not easy to find! I hope you’re well and that we can get in contact soon. It’s been too long. G