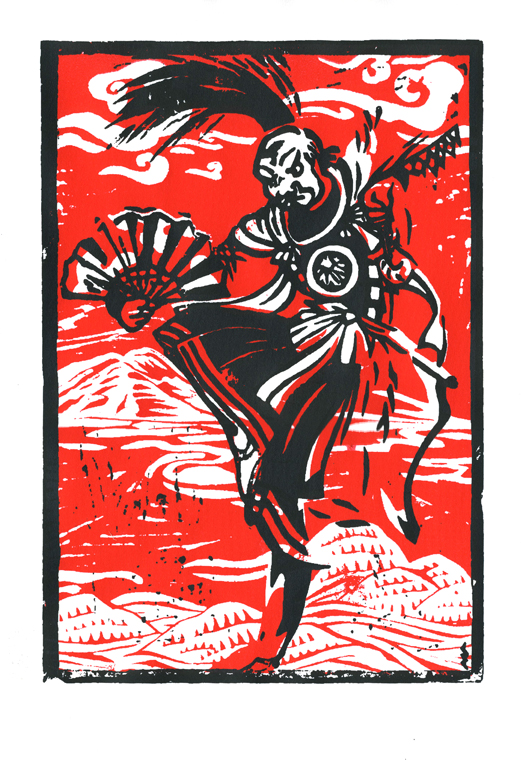
In November a team of Onikenbai performers travelled to Sydney to perform as well as conduct workshops. For those not in the know Onikenbai is a traditional Japanese dance. Although they are dressed like warriors – wearing oni (demon) masks and carrying katanas (swords), it is actually a Buddhist-inspired dance that acknowledges their ancestry, and the movements symbolise the cleansing of the air and the protection of the earth that they farm. It is not even practiced nationally within Japan which makes it even more unique.

As students of TaikOz we are fortunate that our teachers learn directly from the Iwasaki Onikenbai Hozonaki (Preservation Society) of Iwate Prefecture, the oldest practitioners of onikenbai, and then share their knowledge with the rest of us back in Sydney. It is not an easy dance to learn – its physically demanding, which I believe is part of the ritual cleansing process, and very layered in the feeling and spirit in which you have to dance.
It was a great honour to have an entire team visit us in Australia – to see them perform in the flesh and to learn from them, so I decided to make a gift for them as a thank you.
The concept

The TaikOz community has given me lots of opportunities and inspiration to drawn and paint in the past. The bulk of it being sketches with an ink brush, and to be frank I’m a little over that style. I find when creating art, once I have “worked” a style quite regularly I cant continue it as I get bored – there’s nothing more I can learn from it. It feels like work rather than fun.

I thought I’d challenge myself by creating a linocut. I’ve only done one or two in the past and was dying to do another one. I was familiar with the techniques and had all the tools, it was more a matter of if I could get it done in time. But that’s never stopped me before.
Another issue I had to overcome was how to come up with a linocut design that showed the constant movement of this dance. It’s very elastic in it’s feel, e.g as soon as you stretch out you pull back in, as soon as you push down you come back up. It’s a very complex dance. One has to move with lightness but stay very grounded, it has to be dynamic but show restraint, it has to be masculine but graceful. Generally linocut designs are very line heavy or kind of chunky and angular so I needed to express all this in the picture.


Photo reference was hard to come by, so in the end I had to use my own experience and learnings to get the pose I wanted. I did a few colour thumbnails first to work out how I was going to use colour. The colour choices were largely based on the dominant colours of the fan and uniform. I wasn’t totally convinced I was on the right track, but I felt that if I could make it work as a quick sketch it should work as a linocut.


A Herculean task
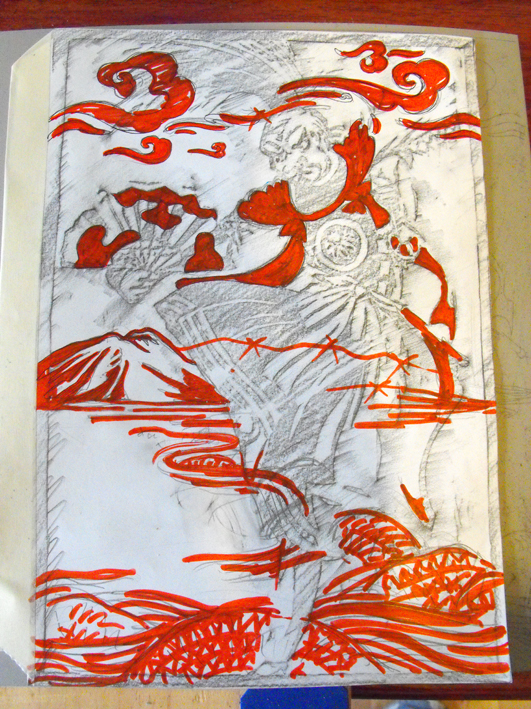
The largest sheet of lino I could get was 300mm x 300mm, but I would have preferred something a bit bigger. I drew up the final design on cartridge paper and it took me awhile to get it right. I scanned it in and adjusted the levels to get rid of all my extra markings and sized it to what I wanted. Once done, I printed it out and shaded in the other side with a stick of willow charcoal. This was going to be my carbon print that would help me transfer my image onto the lino.


I taped the design down onto the lino and used a biro pen to trace over my artwork. It worked really well as the imprint didn’t fade from the lino throughout the whole carving process. So off I went on my big lino cutting adventure. I wont talk about the tips and techniques of this medium because my experience is very limited.

What I will say is that lino cutting is sooo much fun, so therapeutic. I had to ask myself why I didn’t do it more often. I like mediums that have a strong character and qualities that tend to influence your own style and technique as you work.

It took me two weeks and weekends of long late night labour and once I made the final cut it was all done! I sat back, pumped, and looked at my completed mission, feeling really proud of myself and excited about the coming printing stage when I realised…
This is the dumb bit

I didn’t flip my design when I transferred it to the lino cut! It had completely escaped my mind when I began. I made a mental note to reverse the image weeks before, but completely forgot it once I started cutting. Some of you might say that it looks fine and no one could tell it was wrong, but it is. Onikenbai is danced with the fan in the right hand and the sword in the left hand. ALWAYS!! If I was printing it for the general public, yes they would be totally clueless, but it was for the professionals. People who have been practicing this dance since…forever!
What was I going to do? All my energy completely drained from me. I couldn’t entertain the thought of doing another one as I was so exhausted at the end of it plus I didn’t have time. I was so angry at myself for being that stupid. I was in a state and was desperately working out how I could salvage this.
This is the smart bit
That’s when I thought of getting it reproduced as a silk screenprint. I would make one lino print in black, scan it, flip it in photoshop, print it out and use that to create a screen. Could that work? How would I get it done? Would I be able to get it done in time.

Thankfully I came across a screenprinter who runs small workshops and not that far from me too. I sent her a email to see if she could make the screens for me and how much it would cost. I spent a very sleepless night hoping it wasn’t an old ad or a dead end. Thankfully she replied. Not only could I get the screens made by her but I could print them all myself if I signed up for a one day workshop. I was so relieved. And screenprinting was another creative thing I had on my checklist of “things to do” for awhile so it was great to tick that one off as well.
Workin’ it
My spirit was a little better. Anxious, but better. One good thing about putting it through photoshop was I could muck around with colour choices and decide beforehand what I wanted. I also changed the background layer too and inversed it, meaning there would be more colour printed rather than a white paper background.

The workshop was great. I was shown, and involved in, putting my images onto the screens and prepping them too, so I learnt about all the different stages of screenprinting. As each stage started to come together I got more and more excited. And I guess it wasn’t until I put the second, and final, layer of colour on that I sighed a huge relief that it worked. (Anyone interested in the workshops in Sydney click here)


I was really happy with the result. The colours were strong and I was amazed at how much of the detail came through. The trickiest part was lining up the black layer with the red, particularly where the mask was as that had to be a clean white. But I kind of liked that they were occasionally a little out of register, it gave some animation to the image.
And yay, the ogi and katana (fan and sword) were in the correct hands!!
Onikenbai Workshop
Three weeks later we had our workshops and they were awesome. It was amazing to watch them the night of their performance, but to then learn from them was incredibly fulfilling. Basically, it rocked. Despite my body begging for mercy for it to end (three days later I still cant walk properly), I could do it again in a heartbeat. Oh, yeah and they really liked my prints too. Double YAY!

 We were also very lucky to get a private performance from them in full costume on the last day of our workshop, which gave me a chance to draw them. I fought the urge several times over during their “tour” because this was an opportunity to learn, not draw, but I gave in towards the end.
Not an easy task – drawing someone or something that moves so quickly in so many directions. For those unfamiliar with onikenbai it might be hard to see what’s happening in the sketches, but I got a nod of approval from the most senior member that I got it right. Smiley face!


Wow, Meegan, what great art work you did in both dancing and “hanga” (= woodblock print in Japanese)! Beautiful. Yes, I agree the lesser, the better in drawing. How long did it take you to finsih this great hanga work. I’m certain they would love your work. Ah, I wish I could see their dancing. (next time, please let me know.) Keep up your wonderful work!!
Kind regards, Sadadami
Thanks Sadami. Does the word “hanga” also apply to lino cut? Wood is the next level for me – bit intimidated by it at the moment. They were amazing, and it could be something was hinted at being an annual(?) visit, so will let you know next time. They have also invited us to perform at the onikenbai matsuri that happens in August – yoiks!
Hi, Meegan, Hanga = 版-画. 版 means a print plate, a print. 画means a picture. Actaully, we, school kids did lino cut for hanga. So, you may include lino, too. I see, oni kenbai = 鬼”剣舞,” dancing with a sward. Wow, thank you for kindness. Keep up your wonderful work. Your work and drawing skills get better and better, I feel. See you one day at a sketch club or hope we bump into each other!!
Best wishes, Sadami
ahh cool. thanks for that. yep, haven’t been to any meetups in a while – will be heading to the Martin Place one and going to Newcastle in January.
Love the process.